Praktikum 2
digitalRead () dan Komunikasi Serial


Pada praktikum kali ini, kita akan mencoba penggunaan button sebagai input ke arduino, dan membaca hasilnya pada komputer kita. Untuk membuat sebuah robot diperlukan pemahaman tentang sensor. Pada dasarnya sensor ini bekerja layaknya sebuah button, saat satu kondisi tertentu mengalirkan arus listrik dan dilain waktu tidak atau mengalirkan arus listrik dengan proporsi tertentu. Nah, itulah yang nantinya diterima oleh Arduino. Dari hasil bacaan sensor tersebut barulah kita membuat program/sketch aksi apa yang harus dilakukan oleh Arduino terhadap bacaan sensor. Untuk praktikum kali ini kita menggunakan button sebagai sensor kita.


Komponen yang Dibutuhkan

Arduino Uno 1x

Protoboard 1x

Pushbutton 1x

Resistor 10kOhm 1x


Kabel Jumper 3x

Langkah-Langkah Praktikumnya..


klik gambar untuk memperbesar

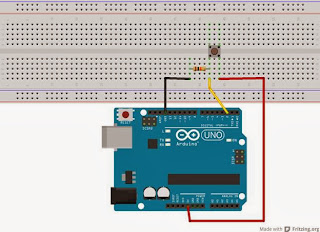
Susun dan rangkai komponen-komponen praktikum seperti gambar di atas.

1. Hubungkan Kaki 1 Push Button dengan pin 5v Arduino menggunakan kabel jumper (gunakan warna merah)

2. Hubungkan Kaki 2 Push Button dengan salah satu kaki Resistor 10KOhm dan pin digital 2 Arduino. Untuk ke pin 2 arduino gunakan kabel jumper (gunakan warna kuning)

3. Hubungkan kaki Resistor yang belum terhubung ke pin Gnd arduino menggunakan kabel jumper (gunakan warna hitam)

4. Pasang dan hubungkan kabel USB ke arduino kemudian sambungkan dengan port USB komputer

5. Bukalah IDE Arduino pada komputer kemudian ketikkan Program/Sketch berikut


Buka Jendela IDE arduino kemudian ketikkan sketch di samping.

int pushButton = 2;

void setup() 
{
  Serial.begin(9600);
  pinMode(pushButton, INPUT);
}

void loop() 
{
 int kondisiButton = digitalRead(pushButton);
  Serial.println( kondisiButton);
  delay(1);
}


6. Compile sketch tersebut menggunakan tombol "verify" atau pilih File >  pada IDE Arduino jika tidak ada error, Upload ke Board Arduino menggunakan tombol "Upload".

7. Buka jendela komunikasi serial pada IDE arduino caranya, pilih Tools > Serial Monitor.

Jika tidak ada kesalahan, maka hasil dari input yang mana dalam praktikum ini yaitu Pushbutton akan terbaca di jendela komunikasi serial pada IDE arduino. Cobalah menekan Pushbutton dan amati hasilnya pada jendela komunikasi serial tersebut.


Diskusi dan Pembahasan Sketchnya..

Baiklah, sekarang kita akan membahas tentang sketch yang telah kita ketikkan. Perhatikan kembali sketch berikut:


Lanjut Membaca..


This email is free from viruses and malware because avast! Antivirus protection is active.


Belajar Membuat Robot

DASAR INPUT & OUTPUT DIGITAL

PRAKTIKUM 3

TUJUAN PRAKTIKUM

Praktikan mampu memahami beberapa contoh project sederhana dari praktikum-praktikum sebelumnya.

Praktikan dapat memahami penggunaan dari sytax: for(;;), array[] = {,,,}

HARDWARE

(1xArduino, 1xProtoboard, 6xLED5mm, 7xkabel jumper, 6xResistor330Ω atau 1kΩ)

LANGKAH PRAKTIKUM

Baca Selengkapnya di BBROBOT INDONESIA


This email is free from viruses and malware because avast! Antivirus protection is active.


BELAJAR BIKIN ROBOT YUK…!!!

IKUTIN TUTORIALNYA DISINI


This email is free from viruses and malware because avast! Antivirus protection is active.


[Arduino Course] #06: Blink an LED

Blinking an LED with digitalWrite() >>
ARDUINO for ABSOLUTE BEGINNERS

Tutorial 06: Blink an LED


Hey there - hope you are well.

The first program you usually write when learning a new programming language is called “Hello World”.  The program outputs those words as it only function.  When learning to program micro-controllers such as the Arduino, the equivalent of “Hello World” is a program that blinks an LED.  Guess what it is called – Blink.

(click here to read the full article >>)

Follow on Twitter   Forward to Friend 
Copyright © 2013 Open Hardware Design Group, All rights reserved.
You are receiving this email because you signed up at our website www.OpenSourceHardwareGroup.com - the opt in button may have been disguised as a chance to win an Arduino flown into space on the last flight of Space Shuttle Discovery. From now on though, we will be perfectly honest and will do our best not to waste your valuable time.

Our mailing address is:
Open Hardware Design Group
274 Castle Blvd
Akron, OH 44313

Add us to your address book


Email Marketing Powered by MailChimp
unsubscribe from this list   update subscription preferences 
 

[Arduino Course] #05: Understanding Variables

Understanding Variables>>
ARDUINO for ABSOLUTE BEGINNERS

Tutorial 05: Understanding Variables


Hello!

Let us have a discussion about a powerful and semi-confusing programming topic – variables.
 
A variable is like a bucket.   You choose what types of stuff you want in the bucket and can change the contents as often as you like.  When you declare a variable, you are telling the program two things, firstly – what types of things you plan to put in the bucket, and secondly, what the name of the bucket is so you can refer to it later.

(click here to read the full article >>)

Follow on Twitter   Forward to Friend 
Copyright © 2013 Open Hardware Design Group, All rights reserved.
You are receiving this email because you signed up at our website www.OpenSourceHardwareJunkies.com - the opt in button may have been disguised as a chance to win an Arduino flown into space on the last flight of Space Shuttle Discovery. From now on though, we will be perfectly honest and will do our best not to waste your valuable time.

Our mailing address is:
Open Hardware Design Group
274 Castle Blvd
Akron, OH 44313

Add us to your address book


Email Marketing Powered by MailChimp
unsubscribe from this list   update subscription preferences 
 

[Arduino Course] #04: Understanding Syntax

Understanding Syntax>>
ARDUINO for ABSOLUTE BEGINNERS

Tutorial 04: Understanding Syntax


Welcome back!  

The coding language that Arduino uses is very much like C++ (“see plus plus”), which is a common language in the world of computing.  The code you learn to write for your Arduino will be very similar to code you write in any other computer language – all the basic concepts remain the same – it is just a matter of learning a new dialect should you pursue other ventures.

The code you will be writing is called “human readable”, that is, it will make sense to you (sometimes) and will be organized for a human to follow.  Part of the job of the IDE is to take the human readable code and translate it into machine-readable code to be executed by the Arduino.  This process is called compiling. 


(click here to read the full article >>)

Follow on Twitter   Forward to Friend 
Copyright © 2013 Open Hardware Design Group, All rights reserved.
You are receiving this email because you signed up at our website www.OpenSourceHardwareJunkies.com - the opt in button may have been disguised as a chance to win an Arduino flown into space on the last flight of Space Shuttle Discovery. From now on though, we will be perfectly honest and will do our best not to waste your valuable time.

Our mailing address is:
Open Hardware Design Group
274 Castle Blvd
Akron, OH 44313

Add us to your address book


Email Marketing Powered by MailChimp
unsubscribe from this list   update subscription preferences 
 

[Arduino Course] #03: Arduino IDE and Sketch Overview

Arduino IDE Overview>>
ARDUINO for ABSOLUTE BEGINNERS

Tutorial 03: Arduino IDE sketch and overview


Welcome back!  

I hope you have the Arduino IDE installed and running ok.  If you have any troubles, feel free to send me your questions.

If you recall, IDE stands for Integrated Development Environment.  Pretty fancy sounding, and should make you feel smart anytime you use it.  The IDE is a text editor like program that allows you to write computer code for your Arduino board.  When you open up the Arduino program, you are opening the IDE.  It is intentionally stream lined to keep things as simple and straightforward as possible.  When you save a file in Arduino, the file is called a sketch – a sketch is where you save all the computer code that you have written.

(click here to read the full article >>)

Follow on Twitter   Forward to Friend 
Copyright © 2013 Open Hardware Design Group, All rights reserved.
You are receiving this email because you signed up at our website www.OpenSourceHardwareJunkies.com - the opt in button may have been disguised as a chance to win an Arduino flown into space on the last flight of Space Shuttle Discovery. From now on though, we will be perfectly honest and will do our best not to waste your valuable time.

Our mailing address is:
Open Hardware Design Group
274 Castle Blvd
Akron, OH 44313

Add us to your address book


Email Marketing Powered by MailChimp
unsubscribe from this list   update subscription preferences 
 
belajar Arduino tutorial untuk pemula.
pulpenkumacet..


[Arduino Course] #02: Download and Install

Downloading and installing the Arduino IDE >>
ARDUINO for ABSOLUTE BEGINNERS

Tutorial 02: Download and Install the Arduino IDE


Now that you have taken a look at the Arduino hardware lets go ahead and download and install the software we will need.

One of the absolute best things about the Arduino platform is how easy it is to get started. The software that installs on your computer is completely free and designed specifically for ease of use. The program is called an Integrated Development Environment, or IDE. The fancy name might intimidate you but it runs just like a text editing program.
 
As with any software install, you may have some peculiar things working on your computer that could hinder a smooth install. I have loaded the Arduino several times on different operating system and have not had too many troubles.
 
(click here to read the full article >>)

Follow on Twitter   Forward to Friend 
Copyright © 2013 Open Hardware Design Group, All rights reserved.
You are receiving this email because you signed up at our website www.OpenSourceHardwareJunkies.com - the opt in button may have been disguised as a chance to win an Arduino flown into space on the last flight of Space Shuttle Discovery. From now on though, we will be perfectly honest and will do our best not to waste your valuable time.

Our mailing address is:
Open Hardware Design Group
274 Castle Blvd
Akron, OH 44313

Add us to your address book


Email Marketing Powered by MailChimp
unsubscribe from this list   update subscription preferences 
 

[Arduino Course] #01: Arduino Hardware Overview

Learn about the Hardware on your Arduino Board >>
ARDUINO for ABSOLUTE BEGINNERS

Tutorial 01: Arduino Hardware Overview


This lesson focuses on identifying some hardware...What are all the components on that aesthetically pleasing blue circuit board?  What does GND stand for, and what is with the “~” mark next to those plastic lifted holes mean?
 
This tutorial covers the hardware on the board that you will likely use as you work on projects.  It is by no means comprehensive study of the physical layout, but just enough to make you dangerous.

(click here to read the full article >>)
Follow on Twitter   Forward to Friend 
Copyright © 2013 Open Hardware Design Group, All rights reserved.
You are receiving this email because you signed up at our website www.OpenSourceHardwareJunkies.com - the opt in button may have been disguised as a chance to win an Arduino flown into space on the last flight of Space Shuttle Discovery. From now on though, we will be perfectly honest and will do our best not to waste your valuable time.

Our mailing address is:
Open Hardware Design Group
274 Castle Blvd
Akron, OH 44313

Add us to your address book


Email Marketing Powered by MailChimp
unsubscribe from this list   update subscription preferences